We provide a special version of the plugin that is able to generate avatars compatible with the Unity Multipurpose Avatars (UMA 2) plugin.
UMA avatars are available only on the Pro subscription plan!
Configuration
- Import the UMA 2 unity plugin from the asset store into your project. We recommend using the UMA version 2.12 which is also available at UMA official Github repository.
- Import the Avatar SDK for UMA plugin v2.4.0.3 into your project.
- Follow the instructions on the Authentication window that appears after importing the plugin.
- Add UMA assets from the "Avatar SDK" plugin into the UMA Global Library. To do it open "Window -> Avatar SDK -> UMA -> Force to Update Global Library".
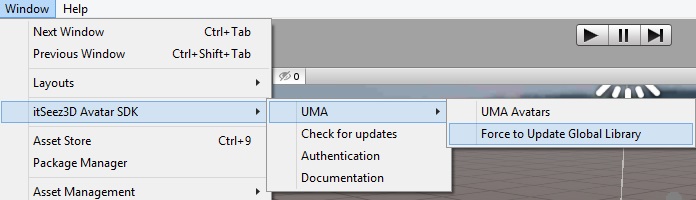
Update UMA Global Library
How to generate UMA avatars and modify DynamicCharacterAvatar in runtime
00_basic_sample_uma ("iseez3d/avatar_sdk_uma/samples/00_basic_sample/00_basic_sample_uma.unity") demonstrates how you can generate UMA avatars in your application.
Parameters
The sample allows to configure three common parameters for UMA avatar:
- Race. The generated avatar can be compatible with the following races: avatar_sdk_male_highpoly, avatar_sdk_female_highpoly, HumanMaleHighPoly and HumanFemaleHighPoly.
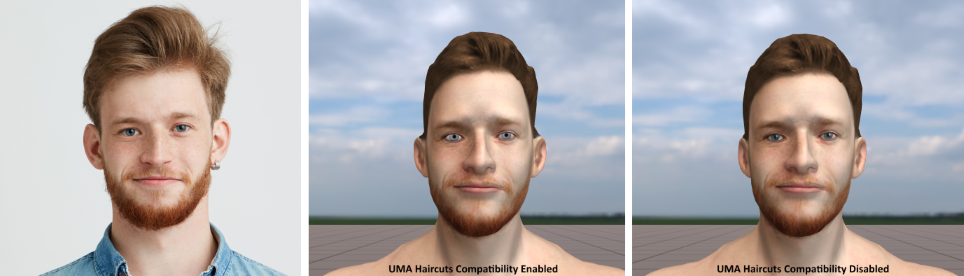
- Compatibility With UMA Haircuts. If this parameter is enabled, UMA haircuts will fit the generated avatar. More head similarity to the source picture can be achieved by disabling this parameter. But in this case, the head won't be compatible with other UMA haircuts and hats, only the generated haircuts will be applicable. When the parameter is enabled, we modify only skeleton bone positions for the avatar. In other cases, the head vertices are also modified and it gives a better head shape.
This parameter is matched to the allow_modify_vertices from the Avatar Modification.
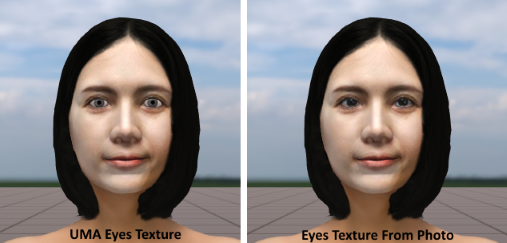
- UMA Eyes Texture. If this parameter is enabled, we take the default UMA eyes texture and recolor it corresponding to a person's eyes color on the photo. If disabled, the eyes texture will be taken from the source picture.
This parameter is matched to the parametric_eyes_texture from the Avatar Modification.
All avatars in this sample are generated with the enabled "enhance_lighting" and "remove_smile" options by default. See our api documentation to get more details about these options.
You can disable them in the code: BasicSampleUma.cs, GenerateAvatarFunc method method.
Code sample
To generate UMA avatar and download it from the cloud you should use UmaAvatarProvider object. See the sample method below on how it can be done. The downloaded UMA data consist of few textures (head, body, eyes), T-Pose and vertices of the Head mesh.
private IEnumerable GenerateUmaAvatar(IUmaAvatarProvider umaAvatarProvider, byte[] photoBytes)
{
yield return parametersRequest;
ComputationParameters parameters = ComputationParameters.Empty;
parameters.haircuts = parametersRequest.Result.haircuts;
parameters.avatarModifications = parametersRequest.Result.avatarModifications;
parameters.avatarModifications.allowModifyVertices.Value = true;
parameters.avatarModifications.parametricEyesTexture.Value = true;
parameters.avatarModifications.removeSmile.Value = true;
parameters.avatarModifications.enhanceLighting.Value = true;
var initializeRequest = umaAvatarProvider.InitializeAvatarAsync(photoBytes,
"name",
"description",
PipelineType.UMA_MALE, parameters);
yield return initializeRequest;
string avatarCode = initializeRequest.Result;
var calculateRequest = umaAvatarProvider.StartAndAwaitAvatarCalculationAsync(avatarCode);
yield return calculateRequest;
UmaCloudAvatarProvider umaCloudAvatarProvider = umaAvatarProvider as UmaCloudAvatarProvider;
var downloadingRequest = umaCloudAvatarProvider.DownloadAndSaveUmaAvatarDataAsync(avatarCode);
yield return downloadingRequest;
}
Uma Avatar Manager
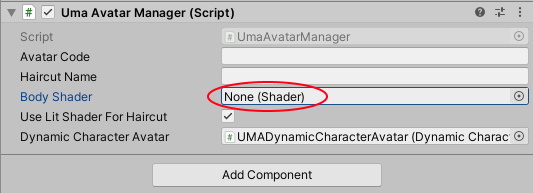
UmaAvatarManager script is used to modify UMA character on the scene. Create an instance of Uma Avatar Manager, assign the Dynamic Character Avatar field and call the ModifyAvatarAsync with a code of the generated avatar and name of the haircut (if it should be displayed). The Uma Avatar Manager has the following configurable parameters:
- Avatar Code. If the value is provided, the avatar with this code will be loaded on a startup and applied to the DynamicCharacterAvatar.
- Haircut Name. The haircut name which will be loaded on a startup.
- Body Shader. You can change the shader that renders character's body. By default, it is a Standard shader. In the sample, we are using Avatar SDK/UMALitShader which gives better color reproduction of the sample photo.
- Use Lit Shader For Haircut. Configures lit or unlit shader is used to render haircut.
- Dynamic Character Avatar. UMA character object that is modified. The "Dynamic Character Avatar" should be one of the following races: avatar_sdk_male_highpoly, avatar_sdk_female_highpoly, HumanMaleHighPoly or HumanFemaleHighPoly!
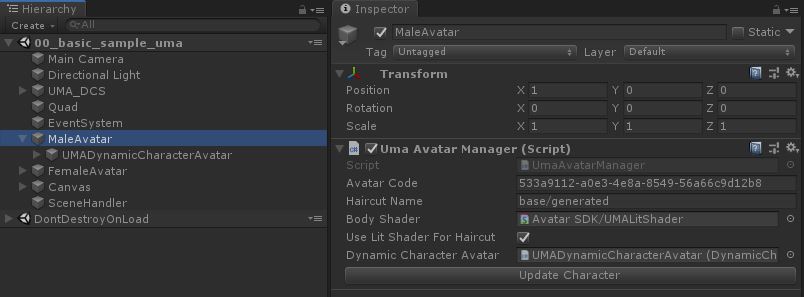
Configure Uma Avatar Manager
Wardrobe update
If you make any updates in the wardrobe list, the avatar generated at runtime is reverted back to the default state. To show the generated avatar again, call the ModifyAvatar method.
umaAvatarManager.ModifyAvatar();
How to generate UMA assets for the Avatar
It is possible to create a new Race along with the appropriate Uma assets for the avatar.
- Generate UMA avatar in the Unity Editor. Use the "Assets/itseez3d/avatar_sdk_uma/samples/00_basic_sample/scenes/00_basic_sample_uma.unity" sample for it.
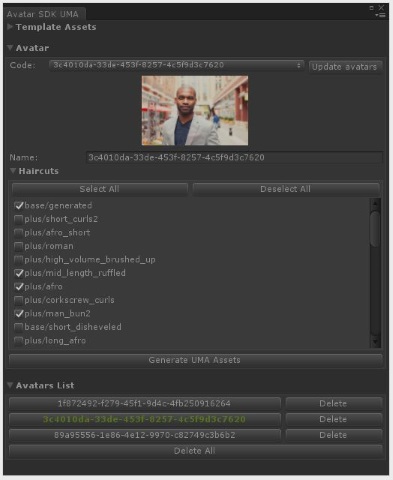
- Open the Avatar SDK UMA window (Window -> Avatar SDK -> UMA -> UMA Avatars).
- Select the avatar in the Avatars List.
- Configure haircuts for which UMA slots should be generated.
- Press the "Generate UMA Assets" button.
Generate Uma Assets
- Each avatar is represented by its own race. Also we generate T-Pose, RaceRecipe, Overlays (Head, Eyes and Body), Slots (Head, Eyes, Mouth) and haircuts assets.

Generated Uma Assets
- To use this Race, find the UMADynamicCharacterAvatar object on your scene and set the Active Race to the created one.

Choose new Race
- If you need to add a haircut to the character, find the created haircut recipe and drag it to the Wardrobe Recipes collection of the "DynamicCharacterAvatar"
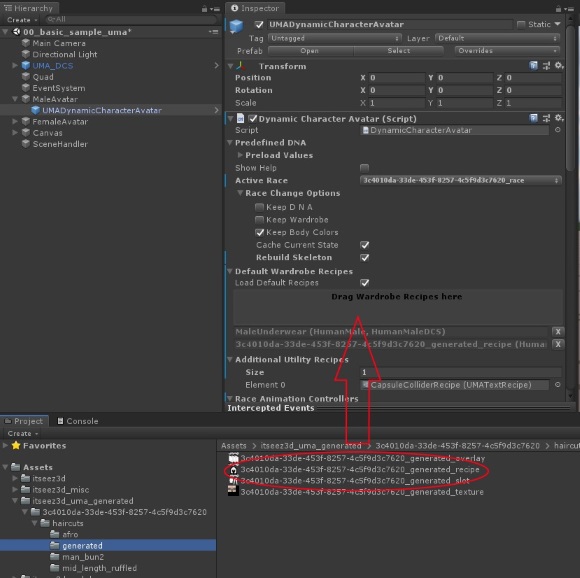
Choose new Race
Supported Races and LODs
Avatar SDK Uma plugin supports four races: avatar_sdk_male_highpoly, avatar_sdk_female_highpoly, HumanMaleHighPoly and HumanFemaleHighPoly.
The avatar_sdk_male_highpoly, avatar_sdk_female_highpoly races based on the HumanMaleHighPoly and HumanFemaleHighPoly races and have differences in the initial T-Poses.
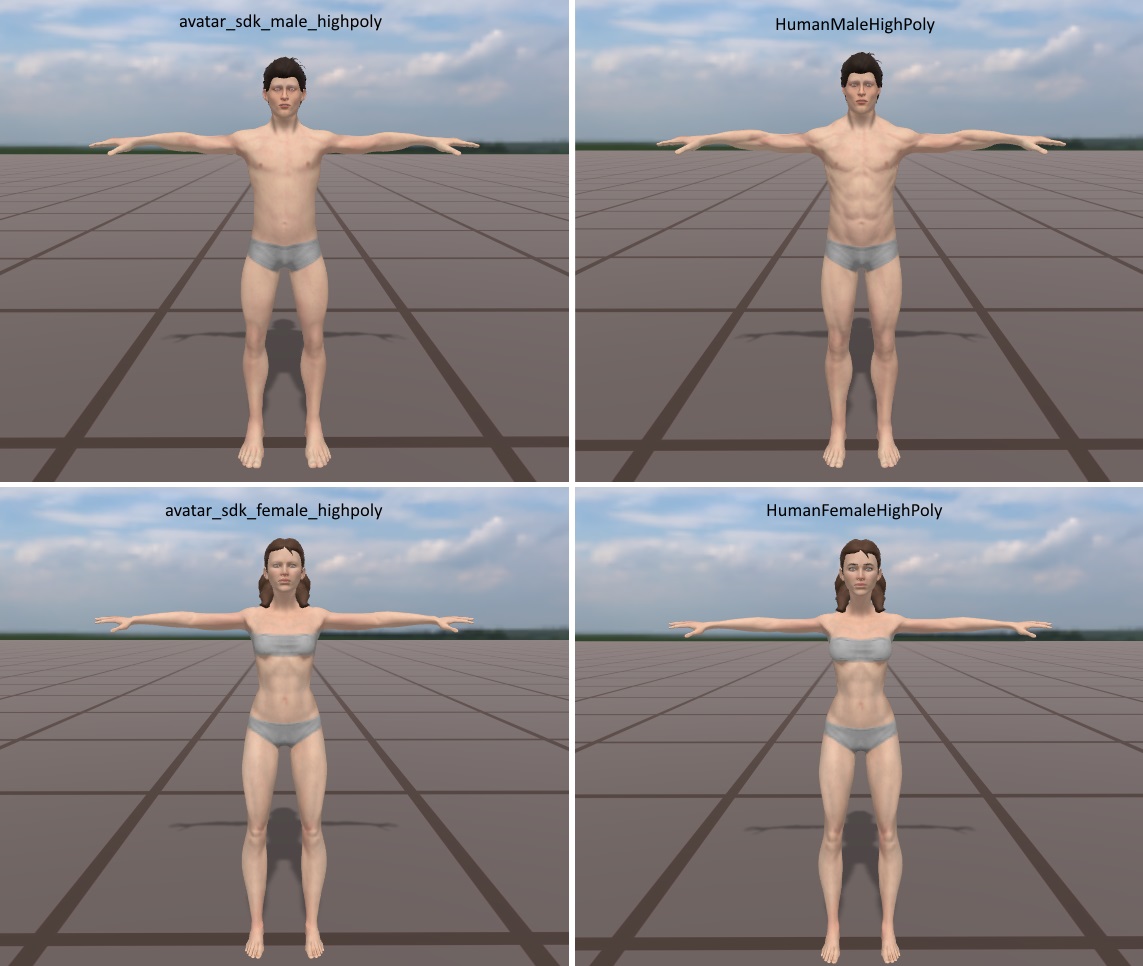
Races Comparison
The character's mesh size is ~14.5K vertices, ~27K triangles.
The low poly races (HumanMale and HumanFemale) are planning to be supported in the feature releases.
Working with Universal Render Pipeline (URP)
The Avatar SDK UMA plugin doesn't work with URP out of the box. Some modifications in materials and scripts are required.
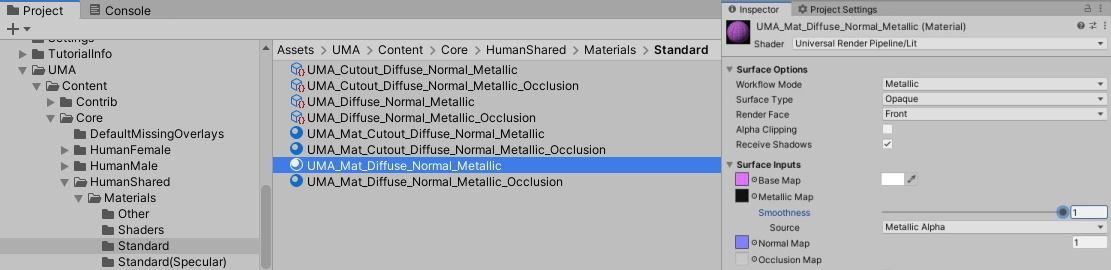
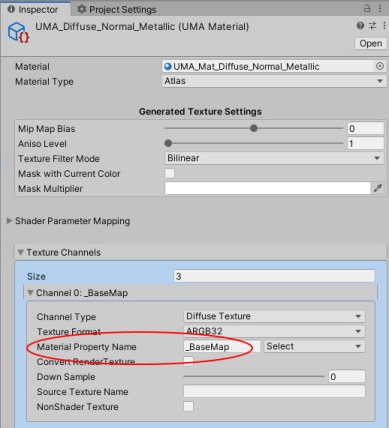
- Select the "Assets/UMA/Content/Core/HumanShared/Materials/Standard/UMA_Mat_Diffuse_Normal_Metallic.mat" material and change the shader to "Universal Render Pipeline/Lit".
- Select "Assets/UMA/Content/Core/HumanShared/Materials/Standard/UMA_Diffuse_Normal_Metallic.asset" and set "Material Property Name" to "_BaseMap".
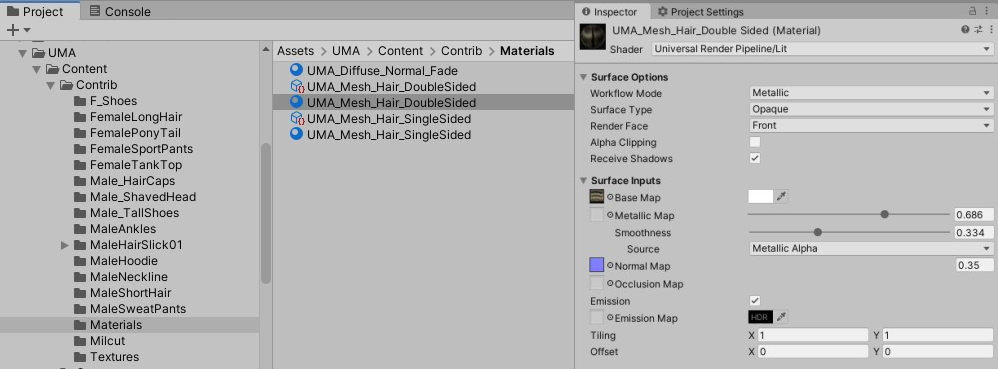
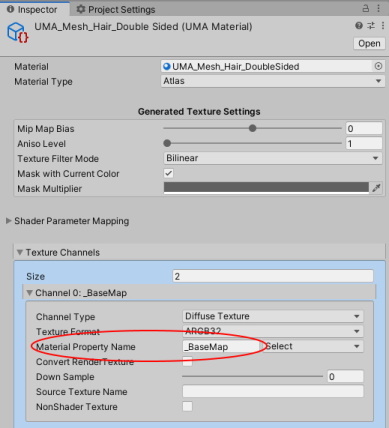
- Select "Assets/UMA/Content/Contrib/Materials/UMA_Mesh_Hair_DoubleSided.mat" material and change the shader to "Universal Render Pipeline/Lit".
- Select "Assets/UMA/Content/Contrib/Materials/UMA_Mesh_Hair_DoubleSided.asset" and set "Material Property Name" to "_BaseMap".
- Select "Assets/itseez3d/avatar_sdk_uma/templates/Haircuts/avatar_sdk_hair_material.mat" material, change the shader to "Universal Render Pipeline/Lit", set "Surface Type" to "Transparent", set "Metallic Map" and "Smoothness" to zero.
- Select "Assets/itseez3d/avatar_sdk_uma/templates/Haircuts/avatar_sdk_hair_uma_material.asset" and set "Material Property Name" to "_BaseMap".
- Open "Assets/itseez3d/avatar_sdk_uma/scripts/modifiers/UmaHaircutSlotModifier.cs" script, find the "Modify" method and remove code where "ShadersUtils.ConfigureHaircutMaterial" method is called.
haircutOverlayAsset.textureList[0] = haircutMesh.texture;
- Disable "Body Shader" in the "Uma Avatar Manager".
 1.8.14