 |
Avatar SDK UE plugin
2.2.0
Realistic avatar generation toolset for Unreal Engine
|
 |
Avatar SDK UE plugin
2.2.0
Realistic avatar generation toolset for Unreal Engine
|
The Avatar SDK UE Plugin includes two sample scenes that demonstrate the functionality of Avatar SDK: Head 2.0 / Head 1.2 sample (Content/Levels/HeadAvatarMap.umap) and Full Body sample(Content/Levels/FullBodyMap.umap).
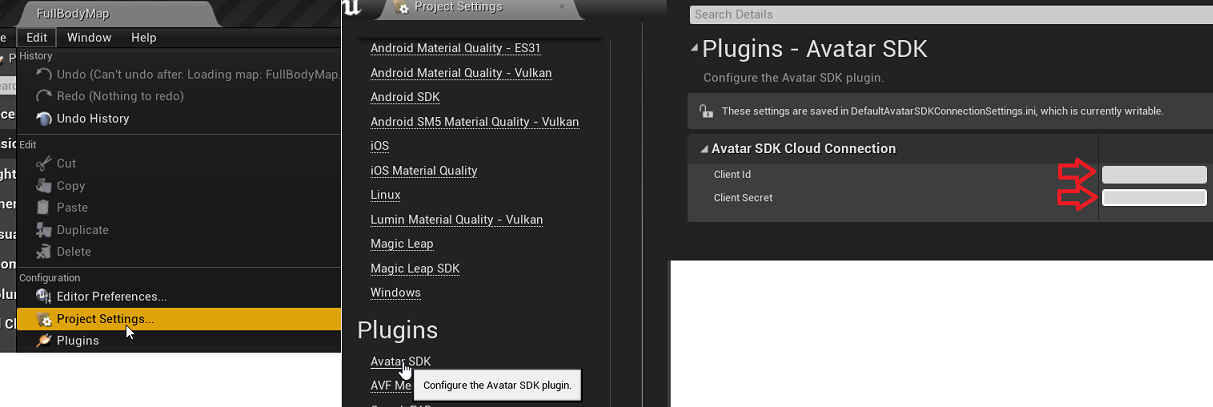
The UE Plugin needs auth credentials to access the cloud API. To generate the avatar in one of two sample scenes you need to provide your App Client ID and App Client Secret available in your Avatar SDK account at https://accounts.avatarsdk.com/developer/ Go to the Edit->Project Settings->Plugins->Avatar SDK section in UE Editor and set these parameters in corresponding fields:

When the connection with Avatar SDK cloud will be established, a relevant message will be printed in the status field:

After that, you need to
a) select the desired pipeline type and subtype for your avatar (for Head 2.0 / Head 1.2 sample only):
Currently “head/mobile” and “bust/mobile” subtypes of the Head 2.0 pipeline and “base/mobile” subtype of the Head 1.2 pipeline are available (see the Main Page ). You can find detailed information about pipelines in the corresponding section of our API documentation
b) select a selfie with the “Select Photo” button.
After that, the avatar generation process begins. The UE Plugin will track the progress of the generation. When the Avatar will be generated, the UE Plugin will download files and display the result on the scene.
![]()
![]()
![]()
![]()
Some new controls appear in the UI once the avatar is displayed: buttons that allow you to switch between haircuts and sliders responsible for setting morph targets values. Controls that manage avatar outfits and animation are also available in Full Body sample.
Keep in mind that in this sample the avatars are always created with a predefined set of parameters that is being constructed in the “MyAvatar” (or “MyFullBodyAvatar” in case of Full Body sample) blueprint.